Monday, December 16, 2013

Chicken Braid


In our house, we don't eat beef or pork. It's not a religous thing, we just don't. So, we have chicken....a LOT! I try to switch it up so we aren't repeating the same chicken dinners over and over. 

I found this little gem of a recipe a couple weeks ago and have been waiting for the right time to try it out! It's AH-MAZING!!

Please try it and let me know what you think! It kind of reminds me of a mix between an awesome chicken salad and chicken pot pie (maybe that's not the best description, but believe me, it's good)!


This looks complicated, but it's not and SO worth the effort! 

IINGREDIENTS NEEDED:
1 can of refrigerated crescent rolls
2 1/2 cups shredded, cooked chicken
1/2 red bell pepper, chopped
1/4 onion, chopped
1 bag of steam in-bag broccoli, cooked & chopped (About 1 1/2 Cups)
1 cup shredded cheddar cheese
1 clove garlic, minced
1tsp olive oil
1/3 cup mayo
Salt & pepper to taste


1. Preheat oven to 375.

2. Add olive oil, bell pepper, onion and garlic to pan and saute until tender.

3. In another bowl, add chicken, broccoli, mayo and cheese together. When veggies are finished in pan, add them to this mixture also. Add salt and pepper to your liking.

4. On a baking sheet lined with parchment paper and sprayed with Pam, lay out the crescent rolls (seperated in to 8 rolls)....big sides overlapping and small end of triangle pointing outward.

5. Pinch the middle of the crescent rolls all the way down the center to make one solid piece to spoon your mixture onto.

6. Fold cresent rolls over the filling, alternating from side to side. It's supposed to look like a braid. I found out this part is not important. Just overlap them as you wish! 

7. Bake until golden brown (about 25 mins). Let it stand for 5 mins and it will cut beautifully into pieces!

ENJOY!

Also, on a side note, I'd like to say THANK YOU! I've reached over 10,000 views! This blog is so much fun! I never imagined that I would meet (and genuinely like!) so many people! You guys are wonderful!!

Wednesday, December 11, 2013

Footprint Reindeer Towels


Christmas time is my favorite time of year, especially with little ones! There are SO many crafts to do with them! I kept seeing these footprint reindeer on Pinterest and decided to give it a try! So, I wrangled up the nearest toddler and got to work!


I started with a couple towels and some brown acrylic paint. I later went to the store for   some felt, too.


The idea is pretty simple. I painted his foot, and then pressed it onto a piece of paper so the extra paint would come off there (and not on my towels). 

I hung them up and left them to dry over night, although it didn't take that long.

I was a little confused about what to use for the antlers, nose and mouth. I had thought about using paint, but bc he was going to give these as gifts, I wanted it to be extra cute! So I opted for felt. SO glad I did!! 

I just cut the felt to look like antlers, and cut circles for the eyes and nose.

I used plain ol' needle and thread to sew them on! I really like the contrasting colors on the antlers, but you can make yours match if you want!

These are the pieces of paper I used to put his foot on first. They were cute, so we decorated these too!

I just used glitter glue. 


Saturday, December 7, 2013

Homemade Ornaments for the Kids!

 
If you have toddlers, these ornaments are for you!  Super easy, fast and cheap!  Both of them cost less than $5 each! 
 
 
I LOVE the dollar section at Target.  I found the snowflake stickers along with some jewel stickers (not pictured because we used them all and, like a bad blogger, I took the picture after we finished)!
 
The idea is pretty simple.  I used foam and jewel stickers, glitter glue (3 pack from my local dollar store) and felt Christmas tree garland (also from Target's dollar section).


 This is what the garland looked like out of the package.  There were 8 Christmas trees so I just cut the ribbon so that I would have enough to glue back on to make a hanging loop.
 
 
Once they were cut, we got busy using stickers and glitter glue.  I love the way these turned out!  They are going to be delivered to preschool teachers (along with some other fun gifts I'll share with you later).


 The next ornaments would make a fun "busy" project for the little ones.  We gathered some pine cones from the backyard, bought the pom-poms and ribbon (for $1 each) and used some glue and glitter that I had on hand from other projects.
 
 
PINE CONE HINT:  Put your pine cones in the oven on 200 for about 45 mins.  This kills any little critters that may be living on them.
 
Cut and tie your ribbon to the desired length and then let the little guys decorate!
 
 
We used Elmer's glue and the pom-poms stayed put!  We "painted" some glue on the tips with q-tips when he finished with the pom-poms, then sprinkled glitter.  The picture doesn't really do it justice. 
 
 
 Have fun and happy ornament making!!

Wednesday, December 4, 2013

Rice Filled Hand Warmers

Recently, I taught myself how to use my sewing machine (that I've had for 10+ years...sad, I know). I'm so extremely excited about it though!

So, I went straight to Pinterest and started looking for fun, easy projects. I stumbled upon these cute little hand warmers and, after making them for everyone I know, I've mastered them! So, I thought I'd share!

They're so easy to make. All you need is:
*About 2 cups of uncooked, long grain rice
*2 fabric squares (4in x 4in)
*A sewing machine


1. Cut your fabric to any size you want.  I chose 4in x 4in.  This is a great size to stick in your pocket and perfect for the back of your neck if you have a headache.


2. Place right sides together (you know, the pretty sides) and sew along 3 edges.  Once you get to the 4th side, leave a hole about an inch long.
 
3. Now it's time to turn it right side out!  Just shove and pull until you get it all through the hole you left.
 
 
4. Using a funnel, start filling with rice.  Don't put too much in or it will be bulky and the rice won't be able to move around in there.
 
HINT: I like to spread my rice on a cookie sheet covered with wax paper.  Then I add a couple drops of essential oil, mix it all up and spread back out.  When it's dry, then use it to fill your handwarmer.  Everytime you heat it up, it will smell wonderful!


5. After you fill it, hand sew the 1inch opening and you're done!  I like to tie them together with a ribbon if I'm giving as a gift.  Sorry about this picture quality.  I forgot to take a picture before I gave them away so I had to ask them to send me one!  Oops!
 
To heat, just put in the microwave for 15-25 seconds (or until they reach the temperature you want).  I like to also keep a couple in the freezer.  They are great for headaches!  If you do them in a fun print, they also make great "boo-boo" packs!
 
 
These were the first ones I made!  I was (and still am) so proud of these little guys!!   Please let me know how yours turn out!  If you have any questions, feel free to comment or email and ask.  I'm NO professional, but I'll be happy to try to help you out! 
 
Good luck and happy sewing!

Monday, December 2, 2013

Green Smoothies

Let's talk about green smoothies....SO GOOD! Around here, we both have one for breakfast every single day. If you've never had one, you're probably asking why....right?

Well, I'll tell you.
#1: They taste great!
#2: They're extremely good for you!
#3: They are ridiculously easy to make!

I like to make things easy. So, once a week we head out to the local farmer's market and pick up what we need. You can put anything in yours, but this is what I put in mine:
Bananas
Strawberries
Raspberries
Flax seeds
Spinach
Kale
Greek yogurt

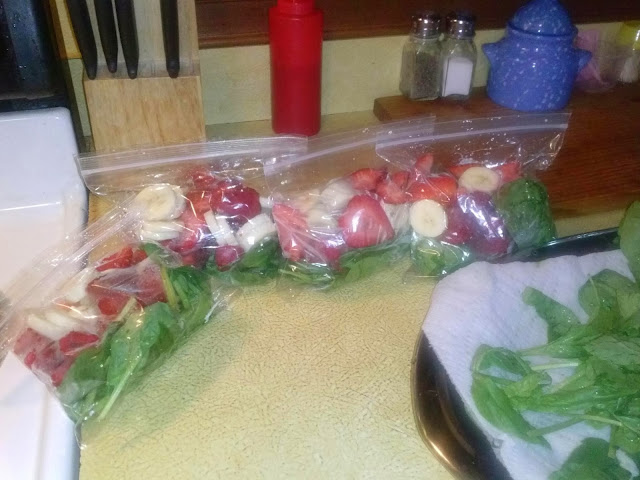
I clean everything when I get home. Slice the bananas and strawberries and put on a cookie sheet along with the raspberries. Put them in the freezer until frozen. (I do this so that they don't freeze together in the sandwich bags.)

Then to a small freezer bag, I add: a handful of spinach and kale and some fruit. The amount you add depends on how big you want your smoothie.

In the morning I take the contents out of a bag, and put it in my nutribullet (if you don't have one, you are REALLY missing out!!!), add one small container of Greek yogurt, a little water and DONE! So good!

If you're not a spinach or kale person, don't worry. If you add strawberries to anything with spinach, you don't end up with a spinach taste!

If you are already drinking green smoothies, good for you! If you're not,  you should try it! You'll be so glad you did!

Friday, November 22, 2013

So far, so awesome!

So...this post has absolutely nothing to do with cooking, baking or anything DIY, but I really wanted to share!
 
Last week, while driving on a very busy street, I saw this little guy stick his head out of a sewer drain! My heart stopped....and so did my car!! He was extremely scared and kept going back in. So, there I was, laying on my stomach in the street, trying to coax him out with food. It worked! And we both fell in love!
 
 
Since then, I found his owner and gave him back, but I'm still SO happy that I could help! He was very far from home, hungry and tired. (It was 26 degrees outside the morning I found him!) His owner was even more happy to have him back...safe and sound!
 
I just felt like I should share such a cute little face with you guys!
 
 
I also want to say thanks!! When I started this blog, I wasn't really sure how it was going to work out, but with more than 1500 views in just a few days, I couldn't be more excited! I love logging on and being able to see who's checking out my posts! I had no idea that people all over the world would be reading! I've made it easy to follow me and comment, so PLEASE do so!
 
THANKS again, everyone!! 

Check back tomorrow for a fun DIY project!  I have all kinds of fun creations planned for the holidays!

Tuesday, November 19, 2013

Easy Reese's Cake

 
I'm so excited to be able to share this recipe!  It comes out so moist and not overly sweet!
 
The only ingredients you will need are:
~ Chocolate Cake Mix (and ingredients called for on box)
~ 2 Packages of King Size Reese's Peanut Butter Cups (Frozen)
~ 1 small can of Sweetened Condensed Milk 
~ 1 container of Cool Whip
 
1.) Mix the cake mix according to package directions.  Put in a greased and floured 9x13 pan and bake until a toothpick inserted in the center comes out clean.
 
2.) Let the cake rest for about 5 minutes, then poke holes with the end of a wooden spoon.  I just randomly poke holes until it looks like enough.


3.) After that, pour about 3/4 of the sweetened condensed milk on the cake.  Try to get as much IN or NEAR the holes as possible. Cover with aluminum foil and put in the refrigerator until completely cool.
 
* NOTE: It will look extremely messy and wet at this point.  Don't be afraid!  It will all drain into the cake eventually. 
 
4.)  Once the cake is completely cooled, cover with the entire container of Cool Whip. Put it on just like you would frosting.
 
5.) Take the Reese's out of the freezer and smash, in the package, with a rolling pin or something heavy.  When the candy is in crumbles, sprinkle on top of the Cool Whip.
 
Sorry, no pics of this step.  I was in a hurry trying to finish the cake and get out the door!
 
 I like to garnish with a little chocolate syrup and sometimes a little melted peanut butter!  This cake is a real treat, especially if you don't like frosting! 
 
I've made this with Butterfinger candy bars crumbled on the top too!  Just use your imagination and you could make ANY flavor combination imaginable!
 
I really hope you try this cake!  It's amazing!  Please make sure you keep it in the refrigerator!

Saturday, November 16, 2013

3 Ingredient Sausage Balls


Sausage and Cheddar....Mmmmm!  These little guys are so easy to make, super yummy, freeze well, reheat well and take no time at all!  Just 3 ingredients?!  Sign me up! 


Super Easy Sausage and Cheese Balls

1 1/2 Cups Bisquick
1 Pound (roll) Turkey Breakfast Sausage
3-4 Cups Shredded Cheddar

Mix the Bisquick and cheddar together first (I always start with about 2 1/2 cups of cheese).
Then add the turkey and mix like you would meatloaf!


I used my cookie dough scoop and made balls a little bigger than walnuts. 
Put them on a cookie sheet (covered with foil and sprayed with non-stick spray).
Bake at 350 for about 30 minutes.


When they are done, let them cool for about a minute and put them on a plate covered with paper towels. 

This recipe made about 48 sausage balls.  It really depends on how big or small you make them. 

Down here in Georgia, these are a real southern treat!  They are great warm OR cold!  If you try this recipe, please comment and let me know how much YOUR family loves them! 


Thursday, November 14, 2013

Camo Cupcakes

It's no secret that I like to bake.  I have quite a few friends who call me on birthdays and other special occasions to request cupcakes, and I am always super happy to get those calls!  It's so rewarding to assist people I love in having a good time!  Yes, I realize how corny that sounds, but it is SO, SO true!!


This past summer, my neighbor called with a very country request.  She wanted camouflage cupcakes with the Browning deer on top.  So....deer and camo is what she got!  I had so much fun making these!   
 
 
The cake itself is simple.  Use your favorite white cake mix and your favorite chocolate cake mix (you can definitely use a box mix if you want).
 
~ Go ahead and make both cake batters. (You should probably preheat the oven now too...sometimes I forget to do that!)
 
~You're going to need 4 bowls:
Bowl #1: 1 cup of white cake batter
Bowl #2: 1 cup of white cake batter, 1Tbsp. chocolate icing and green food coloring (I like to use food color gel, it doesn't get runny this way)- just mix until you get your shade of green the way you want!
Bowl #3: 1 cup of white cake batter and 1 cup of chocolate cake batter
Bowl #4: Just chocolate batter in this one
 
~ Now the fun begins!  Once everything is properly mixed, you can start dropping in spoonfuls of cake batter.  I did this randomly.  I also used white cupcake wrappers.  The color of the cake bleeds through so it looks like the camouflage cake!
 
~ Follow the directions for temperature and timing on the box.  Bake until a toothpick inserted in the center comes out clean.  Let cool completely before frosting.
 
~ I frosted these with vanilla frosting that I tinted green. 
 
~ To make the deer heads, melt peanut butter and chocolate chips together.  Pipe them onto wax paper and let harden.  Then top your cupcakes and you're good to go!
 
 
Happy Baking!  Please send pictures and let me know how these turn out for you!


(**Note:  I do realize that I forgot one deer head.  I didn't notice until I took this picture, but I quickly made one more and slapped it on there...all was well after that!) 

Tuesday, November 12, 2013

Cheap DIY Present

I LOVE homemade gifts! They're my favorite! When someone gives me something homemade, it makes my heart smile!
 
So, when our friends told us about their upcoming wedding anniversary, I knew exactly what I was going to give them! I actually made this the weekend we were invited (which was more than a month before the party)! 
 
I went to the local thrift store for most of my supplies:
~ Ugly frame/picture ($0.95)
~ 2 used spoons of different sizes ($0.10)
 
I really wish I would have found older, more vintage looking spoons, but for $0.05 each, I'm not complaining.
I already had some paint, stickers and a piece of scrapbook paper at home.
 
1.) After taking the glass and picture out of the frame, I gave it a light sanding. Then, painted it. It took about 3 coats before it was the way I wanted.
 
2.) Then I cut the paper to fit inside, put my stickers on and closed it up!
 
3.) Now, the spoon part was a bit tricky. I tried 2 different kinds of glue before one worked. I tried Super Glue and Gorilla Epoxy glue and neither of them worked....the spoons fell right off! I ended up using Liquid Nails.
 
And...the finished product! I love it (and so did they!)!! I have some younger friends that are going to be celebrating a wedding anniversary soon and I thought about making one with forks! You know, "Forking since...."!  Haha...I didn't think that would be appropriate for this couple though!

Monday, November 11, 2013

DIY Sharpie Mug

I know you've all seen them....the Sharpie Mug pins on Pinterest. There are so many variations and some of them are beautiful!
 
I wanted to try it out so I started doing a little research. I found out that you shouldn't use just any old Sharpie. It has to be an oil based paint marker. So, off to Hobby Lobby I went. They have tons of them, any color you could ever want!  I decided to just grab 2....you never know how these things will turn out and I didn't want to have an entire package of markers left if it was a Pinterest fail!
After buying markers, I needed a mug.  I kept reading that most people get theirs at the dollar store. So, that's where I went. I was pleasantly surprised to find quite a few options! With my marker color choices in mind, I went with a fat, white mug. I also picked up a pack of scrap booking stickers!
 
 
Everything you will need:
~ mug
~ oil based Sharpie paint markers
~ stickers
 
 
1. As soon as I got home, I washed my mug and dried it completely.
 
2. I put my stickers on and began to color with the markers. (Hint: the markers are a little tricky! Make sure you open it, push down the tip, recap and then shake well!)
 
3. Once I had it just right, I let it dry for about 10 minutes and peeled off the stickers. It didn't look the way I had hoped so I colored some more until I loved it!
 
4. I put it in the COLD oven and then turned it on. 350 degrees for 30 mins. Please don't put it into a preheated oven. It's very important that the mug heats up AND cools off with the oven!
Once it was completely cool, I took it out. I've washed it by hand and in the dishwasher. No change yet!
 
I tested it in the dishwasher and the microwave and nothing has destroyed it yet! Yay!
 
 
I LOVE it! I've made another trip for more markers and mugs! The possibilities are endless! I can't wait until the holidays so I can give these to family and friends!

Sunday, November 10, 2013

Cracker Bark

Woo hoo!  This is my first post on the new blog and I'm so excited about it!  I previously had a great little blog that started out strong, but then I neglected it...sad, sad, sad!

This one, however, will be filled with posts about all of the fun things I have found on Pinterest and have tried to recreate! This wonderful little recipe is not from Pinterest, but came from a wonderful friend.  She gave it to me and I have been whipping it up for years now!

THIS....is the best Christmas/holiday/anytime creation in the world! I have requests for it ALL year long!  I make it for birthday presents for a few people because they just can't wait until Christmas to get some!  It sounds a little weird, but let me tell you....its AMAZING!!  I'm not sure of the "proper" name, but around here, we simply call it Cracker Bark!

Most of the ingredients needed are probably in your pantry right now:

*1.5 sleeves of saltine crackers
*1 stick of butter (the real stuff!)
*1 cup Brown sugar (I use dark, but have used light and it tastes the same)
*Chocolate chips (about 1/2 cup)
*Peanut Butter chips (about 1/2 cup)

Pre-heat oven to 350 degrees.


1.) Line a cookie sheet with aluminum foil and give it a good spray with your favorite non-stick spray.  Then place your crackers in a single layer, making sure there are no empty spaces. 


2.) Place butter and brown sugar in a small sauce pan over medium-high heat.  Stir while the butter melts and bring to a rolling boil. 


3.) Once the mixture starts to boil, pour over your crackers, being careful to cover each one.  The crackers will spread out a little and that's OK.  I always push mine back together a little with a knife.  Put the pan in the oven and bake for 5 minutes.  The toffee will be very bubbly so be extremely careful when taking it out of the oven.


4.)Let the cracker/toffee sit for one minute and then sprinkle the chocolate and peanut butter chips on top.  Once they start to melt, spread with an offset spatula. (**While the chocolate is still "sticky" you can put crushed crackers, crushed candy or sprinkle of any kind on top.  I usually sprinkle some crackers crumbs, but didn't in this picture.)
 
5.) Cover and put in the refrigerator for about an hour (mine NEVER last that long!).  Then, break, yes...break, into pieces of your choosing and enjoy!  I always keep this in the fridge and its good for at least 5 days (that's what I've been told, but I wouldn't know!).
 
 
I hope you enjoy this as much as we do!  If you try it, please let me know how it turned out!