Monday, December 16, 2013

Chicken Braid


In our house, we don't eat beef or pork. It's not a religous thing, we just don't. So, we have chicken....a LOT! I try to switch it up so we aren't repeating the same chicken dinners over and over. 

I found this little gem of a recipe a couple weeks ago and have been waiting for the right time to try it out! It's AH-MAZING!!

Please try it and let me know what you think! It kind of reminds me of a mix between an awesome chicken salad and chicken pot pie (maybe that's not the best description, but believe me, it's good)!


This looks complicated, but it's not and SO worth the effort! 

IINGREDIENTS NEEDED:
1 can of refrigerated crescent rolls
2 1/2 cups shredded, cooked chicken
1/2 red bell pepper, chopped
1/4 onion, chopped
1 bag of steam in-bag broccoli, cooked & chopped (About 1 1/2 Cups)
1 cup shredded cheddar cheese
1 clove garlic, minced
1tsp olive oil
1/3 cup mayo
Salt & pepper to taste


1. Preheat oven to 375.

2. Add olive oil, bell pepper, onion and garlic to pan and saute until tender.

3. In another bowl, add chicken, broccoli, mayo and cheese together. When veggies are finished in pan, add them to this mixture also. Add salt and pepper to your liking.

4. On a baking sheet lined with parchment paper and sprayed with Pam, lay out the crescent rolls (seperated in to 8 rolls)....big sides overlapping and small end of triangle pointing outward.

5. Pinch the middle of the crescent rolls all the way down the center to make one solid piece to spoon your mixture onto.

6. Fold cresent rolls over the filling, alternating from side to side. It's supposed to look like a braid. I found out this part is not important. Just overlap them as you wish! 

7. Bake until golden brown (about 25 mins). Let it stand for 5 mins and it will cut beautifully into pieces!

ENJOY!

Also, on a side note, I'd like to say THANK YOU! I've reached over 10,000 views! This blog is so much fun! I never imagined that I would meet (and genuinely like!) so many people! You guys are wonderful!!

Wednesday, December 11, 2013

Footprint Reindeer Towels


Christmas time is my favorite time of year, especially with little ones! There are SO many crafts to do with them! I kept seeing these footprint reindeer on Pinterest and decided to give it a try! So, I wrangled up the nearest toddler and got to work!


I started with a couple towels and some brown acrylic paint. I later went to the store for   some felt, too.


The idea is pretty simple. I painted his foot, and then pressed it onto a piece of paper so the extra paint would come off there (and not on my towels). 

I hung them up and left them to dry over night, although it didn't take that long.

I was a little confused about what to use for the antlers, nose and mouth. I had thought about using paint, but bc he was going to give these as gifts, I wanted it to be extra cute! So I opted for felt. SO glad I did!! 

I just cut the felt to look like antlers, and cut circles for the eyes and nose.

I used plain ol' needle and thread to sew them on! I really like the contrasting colors on the antlers, but you can make yours match if you want!

These are the pieces of paper I used to put his foot on first. They were cute, so we decorated these too!

I just used glitter glue. 


Saturday, December 7, 2013

Homemade Ornaments for the Kids!

 
If you have toddlers, these ornaments are for you!  Super easy, fast and cheap!  Both of them cost less than $5 each! 
 
 
I LOVE the dollar section at Target.  I found the snowflake stickers along with some jewel stickers (not pictured because we used them all and, like a bad blogger, I took the picture after we finished)!
 
The idea is pretty simple.  I used foam and jewel stickers, glitter glue (3 pack from my local dollar store) and felt Christmas tree garland (also from Target's dollar section).


 This is what the garland looked like out of the package.  There were 8 Christmas trees so I just cut the ribbon so that I would have enough to glue back on to make a hanging loop.
 
 
Once they were cut, we got busy using stickers and glitter glue.  I love the way these turned out!  They are going to be delivered to preschool teachers (along with some other fun gifts I'll share with you later).


 The next ornaments would make a fun "busy" project for the little ones.  We gathered some pine cones from the backyard, bought the pom-poms and ribbon (for $1 each) and used some glue and glitter that I had on hand from other projects.
 
 
PINE CONE HINT:  Put your pine cones in the oven on 200 for about 45 mins.  This kills any little critters that may be living on them.
 
Cut and tie your ribbon to the desired length and then let the little guys decorate!
 
 
We used Elmer's glue and the pom-poms stayed put!  We "painted" some glue on the tips with q-tips when he finished with the pom-poms, then sprinkled glitter.  The picture doesn't really do it justice. 
 
 
 Have fun and happy ornament making!!

Wednesday, December 4, 2013

Rice Filled Hand Warmers

Recently, I taught myself how to use my sewing machine (that I've had for 10+ years...sad, I know). I'm so extremely excited about it though!

So, I went straight to Pinterest and started looking for fun, easy projects. I stumbled upon these cute little hand warmers and, after making them for everyone I know, I've mastered them! So, I thought I'd share!

They're so easy to make. All you need is:
*About 2 cups of uncooked, long grain rice
*2 fabric squares (4in x 4in)
*A sewing machine


1. Cut your fabric to any size you want.  I chose 4in x 4in.  This is a great size to stick in your pocket and perfect for the back of your neck if you have a headache.


2. Place right sides together (you know, the pretty sides) and sew along 3 edges.  Once you get to the 4th side, leave a hole about an inch long.
 
3. Now it's time to turn it right side out!  Just shove and pull until you get it all through the hole you left.
 
 
4. Using a funnel, start filling with rice.  Don't put too much in or it will be bulky and the rice won't be able to move around in there.
 
HINT: I like to spread my rice on a cookie sheet covered with wax paper.  Then I add a couple drops of essential oil, mix it all up and spread back out.  When it's dry, then use it to fill your handwarmer.  Everytime you heat it up, it will smell wonderful!


5. After you fill it, hand sew the 1inch opening and you're done!  I like to tie them together with a ribbon if I'm giving as a gift.  Sorry about this picture quality.  I forgot to take a picture before I gave them away so I had to ask them to send me one!  Oops!
 
To heat, just put in the microwave for 15-25 seconds (or until they reach the temperature you want).  I like to also keep a couple in the freezer.  They are great for headaches!  If you do them in a fun print, they also make great "boo-boo" packs!
 
 
These were the first ones I made!  I was (and still am) so proud of these little guys!!   Please let me know how yours turn out!  If you have any questions, feel free to comment or email and ask.  I'm NO professional, but I'll be happy to try to help you out! 
 
Good luck and happy sewing!

Monday, December 2, 2013

Green Smoothies

Let's talk about green smoothies....SO GOOD! Around here, we both have one for breakfast every single day. If you've never had one, you're probably asking why....right?

Well, I'll tell you.
#1: They taste great!
#2: They're extremely good for you!
#3: They are ridiculously easy to make!

I like to make things easy. So, once a week we head out to the local farmer's market and pick up what we need. You can put anything in yours, but this is what I put in mine:
Bananas
Strawberries
Raspberries
Flax seeds
Spinach
Kale
Greek yogurt

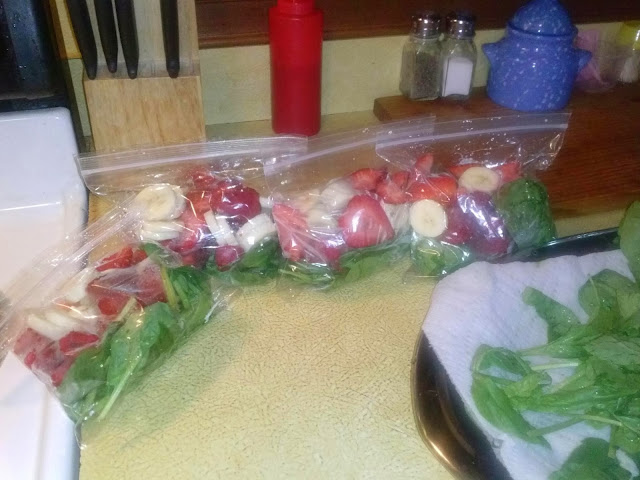
I clean everything when I get home. Slice the bananas and strawberries and put on a cookie sheet along with the raspberries. Put them in the freezer until frozen. (I do this so that they don't freeze together in the sandwich bags.)

Then to a small freezer bag, I add: a handful of spinach and kale and some fruit. The amount you add depends on how big you want your smoothie.

In the morning I take the contents out of a bag, and put it in my nutribullet (if you don't have one, you are REALLY missing out!!!), add one small container of Greek yogurt, a little water and DONE! So good!

If you're not a spinach or kale person, don't worry. If you add strawberries to anything with spinach, you don't end up with a spinach taste!

If you are already drinking green smoothies, good for you! If you're not,  you should try it! You'll be so glad you did!