Showing posts with label Yummy. Show all posts

Friday, May 30, 2014

Not Yo' Momma's Banana Pudding

First of all, this recipe is one for the books.  So go ahead, get your recipe card.....I'll wait here. 
 
Ok, did you get it? Good.  You won't be disappointed. 
 
I have been hoarding this little recipe for years.  I love it when I make something and people ask for the recipe (and that happens EVERY time I make this!)!!  
 
It is a Paula Deen original. (Let me just state for the record that I am not a fan of what she did. I do not endorse that type of behavior or language and I do not think it is ok. However, she can cook. So, I continue making the banana pudding.).
 
With all of that out of the way, I bring you........
 
NOT YO' MOMMA'S BANANA PUDDING!!
 
(and I promise that it's not like your mom's, it is way better!!) 


Gather your ingredients.  You will need:
 
~ 2 packages of Pepperidge Farm Chessmen Cookies
~ 1 Block of Cream Cheese (at room temp)
~ 1 (5oz.) box of instant French Vanilla Pudding (I can't ever find that size so I just get two small boxes and use 1 1/2 of those)
~ 2 cups milk
~ 1 (14 oz) can Sweetened Condensed Milk
~ 1 (12 oz) container Whipped Topping
~ 4-5 bananas, sliced


1. Line your 9x13 pan with one layer of cookies.
 
Feel free to eat the broken ones (there is always at least one)!


2. In a bowl, combine the milk (not the condensed milk) and pudding mix. Blend well.
 
***I like to use less milk. I normally only use about 1 1/2 cups, it makes it a little thicker***
 
3. In a separate bowl, combine the cream cheese and sweetened condensed milk.  Fold (GENTLY) the whipped topping into this bowl.
 
4. Add cream cheese mixture to pudding mixture and blend well. Be careful not to take too much air out of the whipped topping.


5. Now, this is where my recipe differs from the original a bit. Paula tells us to layer bananas on the cookies and pour pudding over. That is not what I do. 
 
I sandwich the bananas in the pudding. So the layers will look like this:
Bottom: Cookies
1st: Pudding
2nd: Bananas
3rd: Pudding
Top: Cookies
 
I do this so that the bananas don't brown as quickly, but you can do the layers however you want.
 
So, add the pudding, put the banana layer on, cover completely with the rest of the pudding and then, last but not least, add the final layer of cookies on the top.


You really need to refrigerate for at least 2 hours before eating.  I like to make mine the night before I need it, that way the cookies have softened up a bit.
 
I am not going to say, "I hope you enjoy this recipe" like I normally do, because I already know you are going to LOVE it!! 

Saturday, February 15, 2014

Pineapple-Cheddar Casserole

  Let me go ahead and warn you that this is one of the BEST casseroles I've ever had!

OK...unless you've had this, I know what you're thinking...
"Pineapples and cheese?! Ewww!"
Am I right?

Well, you couldn't be more wrong!  Honestly, I thought the same thing when I was asked to try it!

It's amazing and I'm not sure why!  One of the greatest things about it is how easy it is, and if you've been following my blog, you know I love easy recipes!  Really, the hardest part is measuring out the few ingredients it takes to make it. 

Pineapple Cheddar Casserole

2 cans pineapple, drained with liquid reserved - one can pineapple chunks and one can tidbits
3/4 cup sugar
1/3 cup and 1 tsp flour
4tbsp pineapple juice
2 cups freshly grated cheddar cheese (please don't use pre-shredded, it has a lot of preservatives)
2/3 cup melted butter
1 sleeve crushed Ritz crackers

Preheat oven to 350 degrees.


1. Mix the first 6 ingredients in a bowl until all flour and sugar have been completely mixed together.


2. Lightly butter a 11x7 casserole dish and pour your mixture in.  Make sure the pineapple chunks and tidbits are spread around evenly. 

3. Spread crushed crackers on the top. At this point you have 2 options, you can cover and refrigerate or you can go ahead and bake.

4. Bake for 40 minutes, uncovered, or until golden brown on top.


This is delicious!  It is a little sweet, a little cheesy and a lot of yummy!

Enjoy!! 

Wednesday, January 29, 2014

Creamy Italian Chicken


I love the smell of an easy dinner in the crock pot, don't you? If you do, this post is for you. 

This is about as easy as it gets. 


You only need 4 ingredients:

* 2 pounds of chicken breasts
* 1 Italian seasoning packet (the dry mix)
* 1 can cream of chicken soup
* 1 (8oz) block of cream cheese


1. Turn your crock pot on low and add all ingredients except chicken.
Let this sit for about 20 minutes so the cream cheese gets soft, then whisk together until it is as smooth as possible.


2. Add chicken and cover with cream cheese mixture.

3. Cook on low for about 5 hours.

4. Serve over rice.


And that's it! This was so good that I only had enough left over to make one of us lunch for the next day!

Monday, January 20, 2014

Chocolate Pudding Frosting


Oh-my-goodness, y'all! This frosting is RIDICULOUS!

(And by ridiculous, I mean good!)

It's so simple, and so yummy! 


Ingredients needed:

- 1 (5.9oz) box of Instant Chocolate Pudding
- 1 (16oz) container of whipped topping
- milk


1.) In a large bowl, mix pudding packet with HALF of the milk called for on the package directions. Whisk until pudding mixture is thick (about 2 minutes).

2.) Fold in 1/2 of the whipped topping.

I ended up using about 3/4 of the whipped topping. Just eyeball it....tasting it works well too!


3. Refrigerate your frosting for at least an hour. This should give you time to bake and cool your cake or cupcakes.


I whipped up my favorite chocolate cake (I'll share this recipe on a different post!) and slathered a good amount between my cake layers, then frosted the entire cake!


I must say this is, by far, not one of my prettiest cakes! It is great for a quick and yummy weeknight dessert though!

I had NO complaints on the appearance, only compliments of how absolutely wonderful it tasted!


Please make sure you keep it in the refrigerator when not serving it. With the milk and the whipped topping, this is important!

You can use any flavor pudding and I'm sure it will turn out just as amazing!

I will definitely be making this with vanilla and banana pudding! The possibilities are endless! 

Enjoy!

Saturday, January 18, 2014

Apple Dump Cake Fail


OK, let's be honest. We've all had one of those awful moments known as a "Pinterest Fail" and this, my friends, was one of mine.

It was supposed to be simple. And good. 

I thought it was right up my alley this night. Ivy loves anything with apples and I just wanted something sweet, so Apple Dump Cake it was.


The recipe and directions are about as easy as it gets. 
-1 yellow cake mix
-1 stick of butter
-4 apples, sliced


I don't like crunchy apples, so I decided to soften them in a pan with a little cinnamon-sugar sprinkled on top.


I sprayed a pan with Pam and poured the apples in the bottom.


Then, as directed, poured the DRY cake mix on top. 
This is where I started to feel like it wasn't going to end well.


Next I melted a stick of butter and poured that on top of the dry cake mix.

The directions say to bake for 25-30 mins at 350. 


As you can see, I left mine in longer. It didn't look done to me and smelled like pure butter....very unappetizing. I didn't even taste it. So sad. 

Does anyone know what I did wrong? I even went back and looked up different Apple Dump Cake recipes and they're all pretty much the same. 

Sunday, January 5, 2014

Chicken and Gravy


Well....what a whirlwind the past couple weeks have  been!  I super love the holidays and look forward to it all year long, however, I'm kinda glad it's over! I've spent weeks getting everything together for all of the goodies that I make for friends and family.  Sadly, I didn't take that many pictures of it. (This whole blogging thing is a lot of fun, but I must admit, I dont always think of taking pics when I'm busy in the kitchen.....oops! I will have to work on that!)

On to the recipe!

This is chicken and gravy. Yum. 

Very easy....even the worst cooks can do this! The recipe comes from good ol Pinterest.

 Enjoy!


What you'll need:

2 lbs chicken breast (this was 5 breasts for me)
2 packages of chicken gravy mix
1 (10oz) can cream of chicken soup
2 cups water
 Fresh cracked Pepper to taste


Mix the soup, water, pepper and gravy pouches together. (Try to get this mixture as smooth as possible. Use a whisk.)

Clean chicken and put in the bottom of the crock pot.


Pour the gravy/soup mixture over the chicken.

Cook on low for 4 hours.

I used 2 forks and shredded my chicken a bit when it was finished cooking.


We had ours over rice (yes, on a paper plate....I despise doing dishes) with a little hot sauce and some green beans! 

So easy, but very yummy! With all of this cold weather, a little comfort food is so nice!

Monday, December 16, 2013

Chicken Braid


In our house, we don't eat beef or pork. It's not a religous thing, we just don't. So, we have chicken....a LOT! I try to switch it up so we aren't repeating the same chicken dinners over and over. 

I found this little gem of a recipe a couple weeks ago and have been waiting for the right time to try it out! It's AH-MAZING!!

Please try it and let me know what you think! It kind of reminds me of a mix between an awesome chicken salad and chicken pot pie (maybe that's not the best description, but believe me, it's good)!


This looks complicated, but it's not and SO worth the effort! 

IINGREDIENTS NEEDED:
1 can of refrigerated crescent rolls
2 1/2 cups shredded, cooked chicken
1/2 red bell pepper, chopped
1/4 onion, chopped
1 bag of steam in-bag broccoli, cooked & chopped (About 1 1/2 Cups)
1 cup shredded cheddar cheese
1 clove garlic, minced
1tsp olive oil
1/3 cup mayo
Salt & pepper to taste


1. Preheat oven to 375.

2. Add olive oil, bell pepper, onion and garlic to pan and saute until tender.

3. In another bowl, add chicken, broccoli, mayo and cheese together. When veggies are finished in pan, add them to this mixture also. Add salt and pepper to your liking.

4. On a baking sheet lined with parchment paper and sprayed with Pam, lay out the crescent rolls (seperated in to 8 rolls)....big sides overlapping and small end of triangle pointing outward.

5. Pinch the middle of the crescent rolls all the way down the center to make one solid piece to spoon your mixture onto.

6. Fold cresent rolls over the filling, alternating from side to side. It's supposed to look like a braid. I found out this part is not important. Just overlap them as you wish! 

7. Bake until golden brown (about 25 mins). Let it stand for 5 mins and it will cut beautifully into pieces!

ENJOY!

Also, on a side note, I'd like to say THANK YOU! I've reached over 10,000 views! This blog is so much fun! I never imagined that I would meet (and genuinely like!) so many people! You guys are wonderful!!

Monday, December 2, 2013

Green Smoothies

Let's talk about green smoothies....SO GOOD! Around here, we both have one for breakfast every single day. If you've never had one, you're probably asking why....right?

Well, I'll tell you.
#1: They taste great!
#2: They're extremely good for you!
#3: They are ridiculously easy to make!

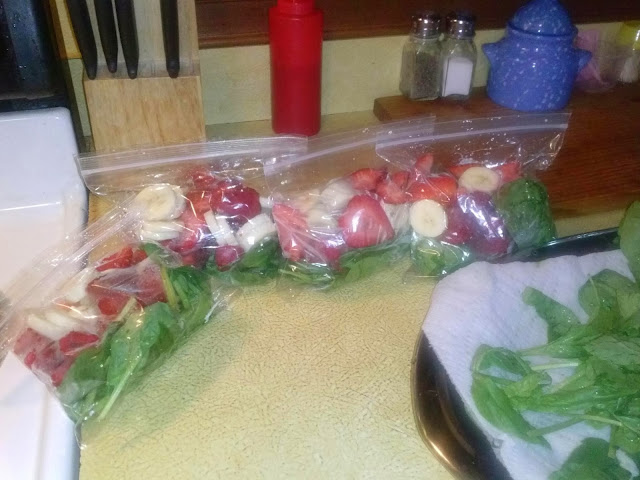
I like to make things easy. So, once a week we head out to the local farmer's market and pick up what we need. You can put anything in yours, but this is what I put in mine:
Bananas
Strawberries
Raspberries
Flax seeds
Spinach
Kale
Greek yogurt

I clean everything when I get home. Slice the bananas and strawberries and put on a cookie sheet along with the raspberries. Put them in the freezer until frozen. (I do this so that they don't freeze together in the sandwich bags.)

Then to a small freezer bag, I add: a handful of spinach and kale and some fruit. The amount you add depends on how big you want your smoothie.

In the morning I take the contents out of a bag, and put it in my nutribullet (if you don't have one, you are REALLY missing out!!!), add one small container of Greek yogurt, a little water and DONE! So good!

If you're not a spinach or kale person, don't worry. If you add strawberries to anything with spinach, you don't end up with a spinach taste!

If you are already drinking green smoothies, good for you! If you're not,  you should try it! You'll be so glad you did!

Tuesday, November 19, 2013

Easy Reese's Cake

 
I'm so excited to be able to share this recipe!  It comes out so moist and not overly sweet!
 
The only ingredients you will need are:
~ Chocolate Cake Mix (and ingredients called for on box)
~ 2 Packages of King Size Reese's Peanut Butter Cups (Frozen)
~ 1 small can of Sweetened Condensed Milk 
~ 1 container of Cool Whip
 
1.) Mix the cake mix according to package directions.  Put in a greased and floured 9x13 pan and bake until a toothpick inserted in the center comes out clean.
 
2.) Let the cake rest for about 5 minutes, then poke holes with the end of a wooden spoon.  I just randomly poke holes until it looks like enough.


3.) After that, pour about 3/4 of the sweetened condensed milk on the cake.  Try to get as much IN or NEAR the holes as possible. Cover with aluminum foil and put in the refrigerator until completely cool.
 
* NOTE: It will look extremely messy and wet at this point.  Don't be afraid!  It will all drain into the cake eventually. 
 
4.)  Once the cake is completely cooled, cover with the entire container of Cool Whip. Put it on just like you would frosting.
 
5.) Take the Reese's out of the freezer and smash, in the package, with a rolling pin or something heavy.  When the candy is in crumbles, sprinkle on top of the Cool Whip.
 
Sorry, no pics of this step.  I was in a hurry trying to finish the cake and get out the door!
 
 I like to garnish with a little chocolate syrup and sometimes a little melted peanut butter!  This cake is a real treat, especially if you don't like frosting! 
 
I've made this with Butterfinger candy bars crumbled on the top too!  Just use your imagination and you could make ANY flavor combination imaginable!
 
I really hope you try this cake!  It's amazing!  Please make sure you keep it in the refrigerator!

Saturday, November 16, 2013

3 Ingredient Sausage Balls


Sausage and Cheddar....Mmmmm!  These little guys are so easy to make, super yummy, freeze well, reheat well and take no time at all!  Just 3 ingredients?!  Sign me up! 


Super Easy Sausage and Cheese Balls

1 1/2 Cups Bisquick
1 Pound (roll) Turkey Breakfast Sausage
3-4 Cups Shredded Cheddar

Mix the Bisquick and cheddar together first (I always start with about 2 1/2 cups of cheese).
Then add the turkey and mix like you would meatloaf!


I used my cookie dough scoop and made balls a little bigger than walnuts. 
Put them on a cookie sheet (covered with foil and sprayed with non-stick spray).
Bake at 350 for about 30 minutes.


When they are done, let them cool for about a minute and put them on a plate covered with paper towels. 

This recipe made about 48 sausage balls.  It really depends on how big or small you make them. 

Down here in Georgia, these are a real southern treat!  They are great warm OR cold!  If you try this recipe, please comment and let me know how much YOUR family loves them! 


Thursday, November 14, 2013

Camo Cupcakes

It's no secret that I like to bake.  I have quite a few friends who call me on birthdays and other special occasions to request cupcakes, and I am always super happy to get those calls!  It's so rewarding to assist people I love in having a good time!  Yes, I realize how corny that sounds, but it is SO, SO true!!


This past summer, my neighbor called with a very country request.  She wanted camouflage cupcakes with the Browning deer on top.  So....deer and camo is what she got!  I had so much fun making these!   
 
 
The cake itself is simple.  Use your favorite white cake mix and your favorite chocolate cake mix (you can definitely use a box mix if you want).
 
~ Go ahead and make both cake batters. (You should probably preheat the oven now too...sometimes I forget to do that!)
 
~You're going to need 4 bowls:
Bowl #1: 1 cup of white cake batter
Bowl #2: 1 cup of white cake batter, 1Tbsp. chocolate icing and green food coloring (I like to use food color gel, it doesn't get runny this way)- just mix until you get your shade of green the way you want!
Bowl #3: 1 cup of white cake batter and 1 cup of chocolate cake batter
Bowl #4: Just chocolate batter in this one
 
~ Now the fun begins!  Once everything is properly mixed, you can start dropping in spoonfuls of cake batter.  I did this randomly.  I also used white cupcake wrappers.  The color of the cake bleeds through so it looks like the camouflage cake!
 
~ Follow the directions for temperature and timing on the box.  Bake until a toothpick inserted in the center comes out clean.  Let cool completely before frosting.
 
~ I frosted these with vanilla frosting that I tinted green. 
 
~ To make the deer heads, melt peanut butter and chocolate chips together.  Pipe them onto wax paper and let harden.  Then top your cupcakes and you're good to go!
 
 
Happy Baking!  Please send pictures and let me know how these turn out for you!


(**Note:  I do realize that I forgot one deer head.  I didn't notice until I took this picture, but I quickly made one more and slapped it on there...all was well after that!) 

Sunday, November 10, 2013

Cracker Bark

Woo hoo!  This is my first post on the new blog and I'm so excited about it!  I previously had a great little blog that started out strong, but then I neglected it...sad, sad, sad!

This one, however, will be filled with posts about all of the fun things I have found on Pinterest and have tried to recreate! This wonderful little recipe is not from Pinterest, but came from a wonderful friend.  She gave it to me and I have been whipping it up for years now!

THIS....is the best Christmas/holiday/anytime creation in the world! I have requests for it ALL year long!  I make it for birthday presents for a few people because they just can't wait until Christmas to get some!  It sounds a little weird, but let me tell you....its AMAZING!!  I'm not sure of the "proper" name, but around here, we simply call it Cracker Bark!

Most of the ingredients needed are probably in your pantry right now:

*1.5 sleeves of saltine crackers
*1 stick of butter (the real stuff!)
*1 cup Brown sugar (I use dark, but have used light and it tastes the same)
*Chocolate chips (about 1/2 cup)
*Peanut Butter chips (about 1/2 cup)

Pre-heat oven to 350 degrees.


1.) Line a cookie sheet with aluminum foil and give it a good spray with your favorite non-stick spray.  Then place your crackers in a single layer, making sure there are no empty spaces. 


2.) Place butter and brown sugar in a small sauce pan over medium-high heat.  Stir while the butter melts and bring to a rolling boil. 


3.) Once the mixture starts to boil, pour over your crackers, being careful to cover each one.  The crackers will spread out a little and that's OK.  I always push mine back together a little with a knife.  Put the pan in the oven and bake for 5 minutes.  The toffee will be very bubbly so be extremely careful when taking it out of the oven.


4.)Let the cracker/toffee sit for one minute and then sprinkle the chocolate and peanut butter chips on top.  Once they start to melt, spread with an offset spatula. (**While the chocolate is still "sticky" you can put crushed crackers, crushed candy or sprinkle of any kind on top.  I usually sprinkle some crackers crumbs, but didn't in this picture.)
 
5.) Cover and put in the refrigerator for about an hour (mine NEVER last that long!).  Then, break, yes...break, into pieces of your choosing and enjoy!  I always keep this in the fridge and its good for at least 5 days (that's what I've been told, but I wouldn't know!).
 
 
I hope you enjoy this as much as we do!  If you try it, please let me know how it turned out!